But I never remember the exact steps to add a new hard drive :-)
First, create the new hard drive:

- "Create new disk".
- Select "VDI" and then "Next".
- Select "Dynamically allocated" and press "Next".
- Write a suitable name of the new drive. Since the drive is dynamically allocated you may select a larger size than you plan to use. About 30GB is what I use in most cases for simple projects. Press "Create".
- The new drive is added.

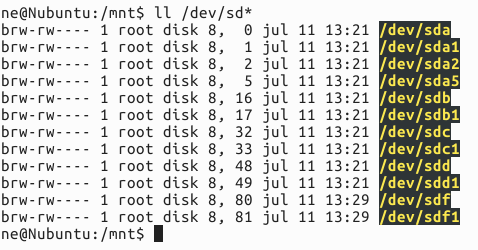
Do "ls -l /dev/sd*" to find the name of the new hard drive:

$ sudo fdisk /dev/sdf
Use the "p" command to check that you are working on the correct drive. Use "n" to create a new partition. Go with the default values all the way:

Now there is a new drive (or actually, partition) available:
Next step is to create a proper file system on this drive:
$ sudo mkfs.ext4 /dev/sdf1

Ok, now we have a proper partition. The final step is to get this partition properly mounted and thus visible and possible to use.
One way of accomplishing this, is as follows:
- Create a new folder in /mnt, e.g.
$ sudo mkdir git
- Determine the UUID of the new partition by using lsblk:

- From the UUID for your partition, you add a new entry into /etc/fstab:
Add the line to the end with
UUID="<your UUID for your partition>" /mnt/git ext4 errors=remount-ro 0 1

Now you are almost done. The next time you reboot the new drive will get added. But you can mount the new partition already at this point by running:
$ sudo mount /mnt/git
Easy? Yes, but it's also easy to forget a step. Especially the "lsblk -f" is something I have to Google every time. Instead of lsblk it's also possible to use the "sudo blkid" command to get the required information.
No comments:
Post a Comment