- Reddit: https://www.reddit.com/r/pokemongo/
- Pokevision to search for Pokémons. I'm not sure this tool is good enough. Time will tell: https://pokevision.com/#/@55.71809470230336,13.339376449584961
- Pokémon GO development tools list: https://www.reddit.com/r/pokemongodev/comments/4trjum/pok%C3%A9mon_go_development_archive_works_in_progress/
- Evolution calculator: http://pogotoolkit.com/
Saturday, July 23, 2016
Pokémon GO links
A few (maybe) useful links:
Wednesday, July 13, 2016
Funny OAT compiler mistake
I noticed a funny bug in the OAT compiler ( http://stackoverflow.com/questions/28435860/what-does-oat-mean ) where the optimization apparently goes wrong. I have only tested this on a few devices that I have, so I don't know how well spread this problem is or if it's fixed in newer versions of Android. One device says it's Android 6.0.1 and one 5.1.1.
Consider the following example:
You would expect the values in the printout for z and zz to be the same. Here is what I got from my first device (Android 5.1.1 on a QualComm Snapdragon 616, 64-bit, platform):
And btw, if your run the same Java code on a standard Java VM on your PC it will produce what you would expect :-)
-----
Update 2016-07-13:
The oatdump utility isn't able to properly disassemble the code. But bringing up the code in gdb instead reveals the problem more clearly. The optimization that fails is that 4 multiply and add operations are brought together with vector operations. Well, it didn't work and I'm very puzzled about why the bug is there. How can have survived and not been discovered during normal regression testing?
The vector stuff:
Consider the following example:
class MyThread extends Thread {
private static MyThread instance;
private static final int LENGTH = 100;
public synchronized static void init() {
if (instance == null) {
instance = new MyThread();
instance.start();
}
}
public void run() {
Random rnd = new Random(314);
for (int i = 0; i < 10; i++) {
int a = rnd.nextInt(9) - 4;
int b = rnd.nextInt(9) - 4;
int z0 = 0;
int z = calcLoop(a, b, z0);
int zz[] = calcArray(a, b, z0);
Log.i("TestCalc", "a=" + a + " b=" + b + " z0=" + z0 + " loop=" + z + " array=" + zz[LENGTH - 1]);
Log.i("TestCalc", "zz[0]=" + zz[0] + " zz[1]=" + zz[1] + " zz[2]=" + zz[2]);
}
}
private int calcLoop(int a, int b, int z) {
for (int i = 0; i < LENGTH; i++) {
z = z * a + b;
}
return z;
}
private int[] calcArray(int a, int b, int z) {
int ret[] = new int[LENGTH];
for (int i = 0; i < LENGTH; i++) {
ret[i] = -123;
}
for (int i = 0; i < LENGTH; i++) {
z = z * a + b;
ret[i] = z;
}
return ret;
}
}
You would expect the values in the printout for z and zz to be the same. Here is what I got from my first device (Android 5.1.1 on a QualComm Snapdragon 616, 64-bit, platform):
a=-1 b=-1 z0=0 loop=-4 array=-1On a device with Android 6.0.1 and QualComm Snapdragon 801, 32-bit, platform:
zz[0]=-1 zz[1]=-1 zz[2]=-1
a=-1 b=1 z0=0 loop=4 array=1
zz[0]=1 zz[1]=1 zz[2]=1
a=-2 b=0 z0=0 loop=0 array=0
zz[0]=0 zz[1]=0 zz[2]=0
a=1 b=2 z0=0 loop=200 array=50
zz[0]=2 zz[1]=2 zz[2]=2
a=-2 b=3 z0=0 loop=134217732 array=33554433
zz[0]=3 zz[1]=3 zz[2]=3
a=3 b=-1 z0=0 loop=1934863036 array=1557457583
zz[0]=-1 zz[1]=-1 zz[2]=-1
a=4 b=1 z0=0 loop=1431655764 array=1431655765
zz[0]=1 zz[1]=1 zz[2]=1
a=3 b=-2 z0=0 loop=-425241224 array=-1180052130
zz[0]=-2 zz[1]=-2 zz[2]=-2
a=2 b=-4 z0=0 loop=-536870896 array=-134217724
zz[0]=-4 zz[1]=-4 zz[2]=-4
a=-4 b=-4 z0=0 loop=858993456 array=-858993460
zz[0]=-4 zz[1]=-4 zz[2]=-4
a=-1 b=-1 z0=0 loop=-4 array=-1This makes no sense. The calculations are totally wrong in almost every case. I'm probably missing something vital here or doing something incredibly stupid. But let's have a look at how the code is compiled:
zz[0]=-1 zz[1]=-1 zz[2]=-1
a=-1 b=1 z0=0 loop=4 array=1
zz[0]=1 zz[1]=1 zz[2]=1
a=-2 b=0 z0=0 loop=0 array=0
zz[0]=0 zz[1]=0 zz[2]=0
a=1 b=2 z0=0 loop=200 array=50
zz[0]=2 zz[1]=2 zz[2]=2
a=-2 b=3 z0=0 loop=134217732 array=33554433
zz[0]=3 zz[1]=3 zz[2]=3
a=3 b=-1 z0=0 loop=1934863036 array=1557457583
zz[0]=-1 zz[1]=-1 zz[2]=-1
a=4 b=1 z0=0 loop=1431655764 array=1431655765
zz[0]=1 zz[1]=1 zz[2]=1
a=3 b=-2 z0=0 loop=-425241224 array=-1180052130
zz[0]=-2 zz[1]=-2 zz[2]=-2
a=2 b=-4 z0=0 loop=-536870896 array=-134217724
zz[0]=-4 zz[1]=-4 zz[2]=-4
a=-4 b=-4 z0=0 loop=858993456 array=-858993460
zz[0]=-4 zz[1]=-4 zz[2]=-4
ubuntu$ adb shellLet's take a look at the calcLoop() method:
device$ su
device# cd /data/dalvik-cache/arm64
device# ll *testcalc*
device# oatdump --oat-file=data@app@com.nicklase.testcalc-1@base.apk@classes.dex --output=/sdcard/nicklas.txt
device# exit
device$ exit
ubuntu$ adb pull /sdcard/nicklas.txt .
2: int com.nicklase.testcalc.MyThread.calcLoop(int, int, int) (dex_method_idx=10812)Seems ok? Let's look at the compiled ARM code:
DEX CODE:
0x0000: const/4 v0, #+0
0x0001: const/16 v1, #+100
0x0003: if-lt v0, v1, +3
0x0005: return v5
0x0006: mul-int v1, v5, v3
0x0008: add-int v5, v1, v4
0x000a: add-int/lit8 v0, v0, #+1
0x000c: goto -11
CODE: (code_offset=0x0027bd6c size_offset=0x0027bd68 size=192)...Well, the "mul" and "add" stuff is there:
0x0027bd6c: d10103ff sub sp, sp, #0x40 (64)
0x0027bd70: a90157f4 stp x20, x21, [sp, #16]
0x0027bd74: a9025ff6 stp x22, x23, [sp, #32]
0x0027bd78: a9037bf8 stp x24, x30, [sp, #48]
0x0027bd7c: b90003e0 str w0, [sp]
0x0027bd80: b90047e1 str w1, [sp, #68]
0x0027bd84: 2a0203f7 mov w23, w2
0x0027bd88: 2a0303f8 mov w24, w3
0x0027bd8c: 2a0403f4 mov w20, w4
0x0027bd90: 2a1f03f5 mov w21, wzr
0x0027bd94: 52800c96 movz w22, #0x64
0x0027bd98: 52800082 movz w2, #0x4
0x0027bd9c: 0b0202b5 add w21, w21, w2
0x0027bda0: 510006b5 sub w21, w21, #0x1 (1)
0x0027bda4: 6b1602bf cmp w21, w22
0x0027bda8: 5400018a b.ge #+0x30 (addr 0x7fccd16cf4)
0x0027bdac: 4f000400 unimplemented (Unimplemented)
0x0027bdb0: 4e040ee1 unimplemented (Unimplemented)
0x0027bdb4: 4e040f03 unimplemented (Unimplemented)
0x0027bdb8: 4ea19c02 unimplemented (Unimplemented)
0x0027bdbc: 4ea38440 unimplemented (Unimplemented)
0x0027bdc0: 0b0202b5 add w21, w21, w2
0x0027bdc4: 6b1602bf cmp w21, w22
0x0027bdc8: 54ffff8b b.lt #-0x10 (addr 0x7fccd16cd4)
0x0027bdcc: 4eb1b800 unimplemented (Unimplemented)
0x0027bdd0: 0e043c03 unimplemented (Unimplemented)
0x0027bdd4: 0b030294 add w20, w20, w3
0x0027bdd8: 4b0202b5 sub w21, w21, w2
0x0027bddc: 110006b5 add w21, w21, #0x1 (1)
0x0027bde0: 6b1602bf cmp w21, w22
0x0027bde4: 540000ea b.ge #+0x1c (addr 0x7fccd16ce0)
0x0027bde8: 1b177e96 mul w22, w20, w23
0x0027bdec: 0b1802d4 add w20, w22, w24
0x0027bdf0: 110006b5 add w21, w21, #0x1 (1)
0x0027bdf4: 52800c96 movz w22, #0x64
0x0027bdf8: 6b1602bf cmp w21, w22
0x0027bdfc: 54ffff6b b.lt #-0x14 (addr 0x7fccd16cd8)
0x0027be00: 71000673 subs w19, w19, #0x1 (1)
0x0027be04: 540000e0 b.eq #+0x1c (addr 0x7fccd16ce0)
0x0027be08: 2a1403e0 mov w0, w20
0x0027be0c: a94157f4 ldp x20, x21, [sp, #16]
0x0027be10: a9425ff6 ldp x22, x23, [sp, #32]
0x0027be14: a9437bf8 ldp x24, x30, [sp, #48]
0x0027be18: 910103ff add sp, sp, #0x40 (64)
0x0027be1c: d65f03c0 ret
0x0027be20: f941f65e ldr x30, [x18, #1000]
0x0027be24: d63f03c0 blr x30
suspend point dex PC: 0x0005
0x0027be28: 17fffff8 b #-0x20 (addr 0x7fccd16ce4)
0x0027bde8: 1b177e96 mul w22, w20, w23But why is the result wrong? I don't know at this point. I will have to dig into it further. The problem seems serious enough to have escaped unnoticed. There is probably a bug report somewhere already...
0x0027bdec: 0b1802d4 add w20, w22, w24
0x0027bdf0: 110006b5 add w21, w21, #0x1 (1)
0x0027bdf4: 52800c96 movz w22, #0x64
0x0027bdf8: 6b1602bf cmp w21, w22
0x0027bdfc: 54ffff6b b.lt #-0x14 (addr 0x7fccd16cd8)
And btw, if your run the same Java code on a standard Java VM on your PC it will produce what you would expect :-)
-----
Update 2016-07-13:
The oatdump utility isn't able to properly disassemble the code. But bringing up the code in gdb instead reveals the problem more clearly. The optimization that fails is that 4 multiply and add operations are brought together with vector operations. Well, it didn't work and I'm very puzzled about why the bug is there. How can have survived and not been discovered during normal regression testing?
The vector stuff:
0x000000000027cdac <oatexec+933292>: movi v0.4s, #0x0If there is a proper way of doing these operations via vector operations? I don't know. I have to think about that another day. In my original application where this problem was encountered, I wanted the "normal" 32-bit wrap around calculations.
0x000000000027cdb0 <oatexec+933296>: dup v1.4s, w23
0x000000000027cdb4 <oatexec+933300>: dup v3.4s, w24
0x000000000027cdb8 <oatexec+933304>: mul v2.4s, v0.4s, v1.4s
0x000000000027cdbc <oatexec+933308>: add v0.4s, v2.4s, v3.4s
0x000000000027cdc0 <oatexec+933312>: add w21, w21, w2
0x000000000027cdc4 <oatexec+933316>: cmp w21, w22
0x000000000027cdc8 <oatexec+933320>: b.lt 0x27cdb8 <oatexec+933304>
0x000000000027cdcc <oatexec+933324>: addv s0, v0.4s
0x000000000027cdd0 <oatexec+933328>: mov w3, v0.s[0]
Monday, July 11, 2016
Mounting hard drives
In VirtualBox I'm constantly adding and removing virtual hard drives since the way you typically work with hard drives in VirtualBox is different compared to a physical computer. Separate projects usually gets it's own hard drive and hard drives are easily cloned when things a properly separated into individual VDI files.
But I never remember the exact steps to add a new hard drive :-)
First, create the new hard drive:
 After that the buttons to press are in order (make sure the virtual machine is shutdown before creating the new hard drive):
 Start the virtual machine, it's time to create the partition table, the file system and mount the new drive.
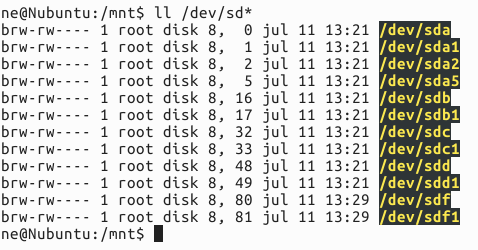
Do "ls -l /dev/sd*" to find the name of the new hard drive:
 In my example it's /dev/sdf since that is the only one without partitions. Next, we use fdisk to create the partition table. Be careful now, you may wipe out your hard drives if you do this incorrectly!
$ sudo fdisk /dev/sdf
Use the "p" command to check that you are working on the correct drive. Use "n" to create a new partition. Go with the default values all the way:
 If everything is correct, use the "w" command to write the changes and exit fdisk.
Now there is a new drive (or actually, partition) available:

Next step is to create a proper file system on this drive:
$ sudo mkfs.ext4 /dev/sdf1

Ok, now we have a proper partition. The final step is to get this partition properly mounted and thus visible and possible to use.
One way of accomplishing this, is as follows:
$ sudo mkdir git

Add the line to the end with
UUID="<your UUID for your partition>" /mnt/git ext4 errors=remount-ro 0 1

Now you are almost done. The next time you reboot the new drive will get added. But you can mount the new partition already at this point by running:
$ sudo mount /mnt/git
Easy? Yes, but it's also easy to forget a step. Especially the "lsblk -f" is something I have to Google every time. Instead of lsblk it's also possible to use the "sudo blkid" command to get the required information.
But I never remember the exact steps to add a new hard drive :-)
First, create the new hard drive:

- "Create new disk".
- Select "VDI" and then "Next".
- Select "Dynamically allocated" and press "Next".
- Write a suitable name of the new drive. Since the drive is dynamically allocated you may select a larger size than you plan to use. About 30GB is what I use in most cases for simple projects. Press "Create".
- The new drive is added.
Do "ls -l /dev/sd*" to find the name of the new hard drive:

$ sudo fdisk /dev/sdf
Use the "p" command to check that you are working on the correct drive. Use "n" to create a new partition. Go with the default values all the way:

Now there is a new drive (or actually, partition) available:
Next step is to create a proper file system on this drive:
$ sudo mkfs.ext4 /dev/sdf1

Ok, now we have a proper partition. The final step is to get this partition properly mounted and thus visible and possible to use.
One way of accomplishing this, is as follows:
- Create a new folder in /mnt, e.g.
$ sudo mkdir git
- Determine the UUID of the new partition by using lsblk:

- From the UUID for your partition, you add a new entry into /etc/fstab:
Add the line to the end with
UUID="<your UUID for your partition>" /mnt/git ext4 errors=remount-ro 0 1

Now you are almost done. The next time you reboot the new drive will get added. But you can mount the new partition already at this point by running:
$ sudo mount /mnt/git
Easy? Yes, but it's also easy to forget a step. Especially the "lsblk -f" is something I have to Google every time. Instead of lsblk it's also possible to use the "sudo blkid" command to get the required information.
Sunday, July 3, 2016
Electric energy production in Sweden and Germany
How the electric energy is produced in Sweden and Germany:
- Germany: https://www.energy-charts.de/energy.htm
- Sweden: http://www.svk.se/aktorsportalen/elmarknad/statistik/?category=52&limit=20&sort=date&modid=5146#5146
Saturday, July 2, 2016
Tracking lightning
The most amazing website you can visit these days: http://www.lightningmaps.org
You will be able to track all lightning struck in your neighborhood or in other parts of the world. In real time! You are even able to follow how the sound travels after the lightning struck.
This is really cool and the information is very useful for us who like biking in the summer but don't like get surprised by a thunder storm.
There are instruction on how you may contribute data to this project by having a "receiver": http://en.blitzortung.org/cover_your_area.php
The receiver unit constantly measures very low frequencies (VLF) in the range of 3 to 30 kHz. When the lightning discharges there is a "signal" sent on those low frequencies. By measuring the time this signal appear at different places the location of the discharge can be calculated (provided that enough receivers are able to pick up the signal).
TdF
Starting today: Tour de France!
Key figures: http://www.letour.com/le-tour/2016/us/key-figures.html
Will the riders get tired? :-)
Key figures: http://www.letour.com/le-tour/2016/us/key-figures.html
- 3535 km
- 21 stages
- 22 teams w 9 rides per team = 198 riders in total starting
Will the riders get tired? :-)
Friday, July 1, 2016
Game of Life in Java
Nice video showing how to get started with Java programming. It's really easy :-)
https://www.youtube.com/watch?v=k3SM-3vZbwU
https://www.youtube.com/watch?v=k3SM-3vZbwU
Subscribe to:
Comments (Atom)